
How to Use Google Authenticator: Complete Setup and 2FA Guide
Published August 9, 2026 · Updated August 20, 2026
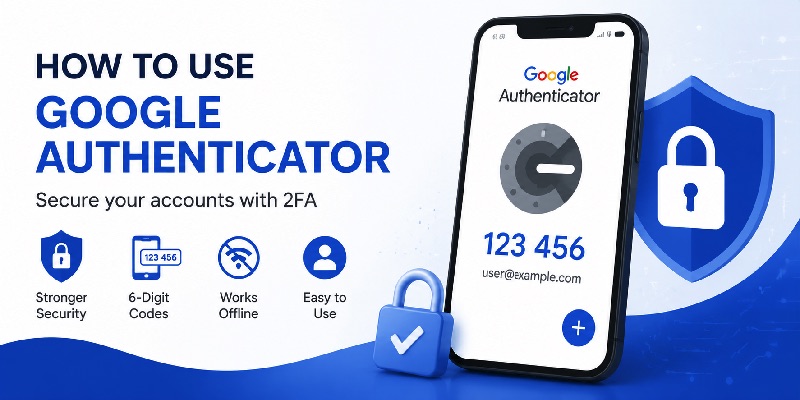
Learning how to use google authenticator is easier than it may first appear. The application is designed to add an extra verification step when you sign in to an online account. Instead of relying only on a username and password, a supported website can ask for a temporary code generated by an authenticator application.
The typical process looks like this:
Website → password → Google Authenticator code → account access
You normally set up the connection only once. After that, Google Authenticator continually generates temporary verification codes for the accounts you have added.
Google Authenticator can generate verification codes without a mobile network or active internet connection, making it useful when traveling or when cellular service is unavailable. Google also currently supports syncing Authenticator codes through a Google Account, although users can choose to use the application without an account.
If you searched how to use google authenticator because a website suddenly displayed a QR code or asked you to “set up an authenticator app,” this guide takes you through the entire process from installation to recovery.
Quick answer
The basic method for how to use google authenticator is:
- Install Google Authenticator.
- Enable two-factor authentication on the website you want to protect.
- Choose Authenticator App as your verification method.
- Display the QR code on the website.
- Open Google Authenticator.
- Tap the + button.
- Scan the QR code.
- Enter the six-digit code generated by the app.
- Save any backup or recovery codes provided by the website.
Once configured, open Google Authenticator whenever that website asks for your authentication code.
1. What Is Google Authenticator and What Is It Used For?
Before learning how to use google authenticator, it helps to understand what the application actually does.
What is the use of Google Authenticator?
The main use of google authenticator is to provide a second verification factor during login.
Passwords can be guessed, leaked, reused, or stolen. Two-factor authentication adds another requirement.
For example:
First factor: Your password
Second factor: A temporary code generated by Google Authenticator
Someone who discovers your password may therefore still be unable to log in without access to your second authentication method.
Google describes 2-Step Verification as an additional security layer that can help protect an account if its password is stolen.
That answers the common question what is the use of google authenticator app: it generates temporary login codes that supported services can use as a second authentication factor.
What happens inside the app?
When you connect an account, the website gives your authenticator a special setup secret, usually through a QR code.
The Authenticator App uses that information to calculate temporary verification codes.
A simplified flow is:
Account setup → QR code → Authenticator App → temporary code
The code changes regularly.
When a website asks for verification, you open google authenticator app, locate the correct account, and type the current code into the login screen.
You do not normally need to manually request a new code.
Apps that use Google Authenticator
Many websites and applications support standard authenticator-based two-factor authentication.
However, the wording can vary.
You may see:
- Authenticator App
- Authentication App
- Verification App
- 2FA App
- TOTP
- Two-Step Verification
- Two-Factor Authentication
A service does not necessarily need to display the Google Authenticator name specifically.
When researching apps that use google authenticator, check whether the service offers authenticator-app or TOTP authentication in its security settings.
📖 Read More Guides:
Google Account Two Step Verification: Complete Setup Guide
2. How to Use Google Authenticator: Quick Start
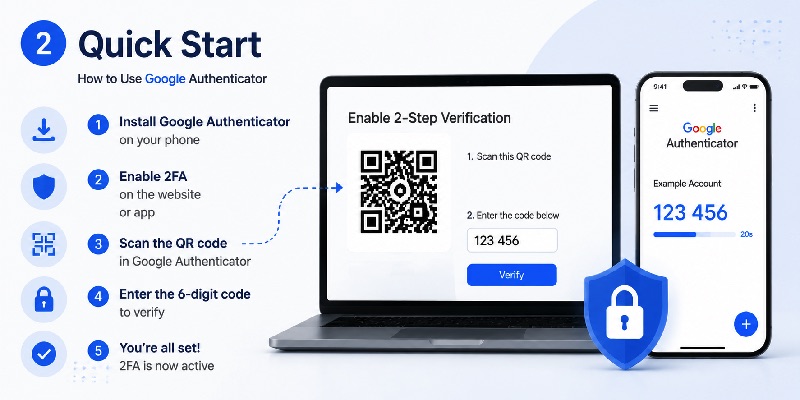
The easiest way to understand how to use google authenticator is to complete one setup from beginning to end.
Step 1: Install Google Authenticator
Start on your smartphone.
Install the official Google Authenticator application from your device’s official app store.
Open the app after installation.
Depending on your configuration, Google Authenticator may allow you to use a Google Account for synchronization or continue without one.
Step 2: Open the account you want to protect
Next, go to the website or application where you want to enable 2FA.
You can usually find the option under:
Settings → Security → Two-Factor Authentication
or:
Account → Security → 2-Step Verification
The exact path varies between services.
Step 3: Select Authenticator App
Choose the authentication-app option.
The website will usually generate a QR code.
Do not treat this QR code like an ordinary public QR code. It contains information used to configure your authenticator and should be kept private.
Step 4: Open Google Authenticator
Now open google authenticator on your phone.
Tap the + button.
Depending on the current app interface, you will normally have options such as scanning a QR code or entering a setup key.
Choose the QR-code option.
Step 5: Scan the QR code
Point the phone camera toward the QR code displayed on your computer, tablet, or another phone.
After scanning, the account should appear in Google Authenticator.
You should see:
- account or service name;
- username or email;
- six-digit verification code;
- indicator showing when the code will refresh.
This is the most important step in how to use google authenticator app.
Step 6: Verify the code
Return to the website.
Enter the current code from Authenticator into its verification field.
Select Verify, Confirm, Continue, or the equivalent button.
Once accepted, your Authenticator App is connected.
Download Authenticator App
Secure your accounts with fast, reliable two-factor authentication. Download now and protect your login in seconds.
3. How to Add an Account to Google Authenticator
Once you understand the first setup, how to use google authenticator with additional accounts becomes much easier.
You do not usually need a separate Authenticator App for every website.
Method 1: Scan a QR code
This is the recommended and simplest method.
On the website:
- Open Security settings.
- Enable two-factor authentication.
- Select Authenticator App.
- Display the QR code.
On your phone:
- Open Google Authenticator.
- Tap +.
- Select the QR scanning option.
- Scan the code.
- Confirm the generated verification code on the website.
The new account should then appear alongside your existing accounts.
Method 2: Enter a setup key
Sometimes you cannot scan the QR code.
For example, the QR code may be displayed on the same phone where Google Authenticator is installed.
In that situation, many websites provide a text-based setup key.
Choose the manual-entry option in your Authenticator App and enter the information supplied by the service.
Be careful when copying the key. A wrong character can cause every generated verification code to fail.
Organize multiple entries carefully
As you learn how to use google authenticator across more accounts, organization becomes important.
You might eventually see entries for:
- personal email;
- work email;
- Facebook;
- cloud storage;
- admin dashboards;
- developer tools;
- social accounts.
Always check both the service name and username before copying a code.
If you have two accounts on the same service, entering a valid code from the wrong account will still result in a failed login.
📖 Explore Articles: FIDO Google: Complete Guide to Secure Login and FIDO2
4. How to Use Google Authenticator When Signing In
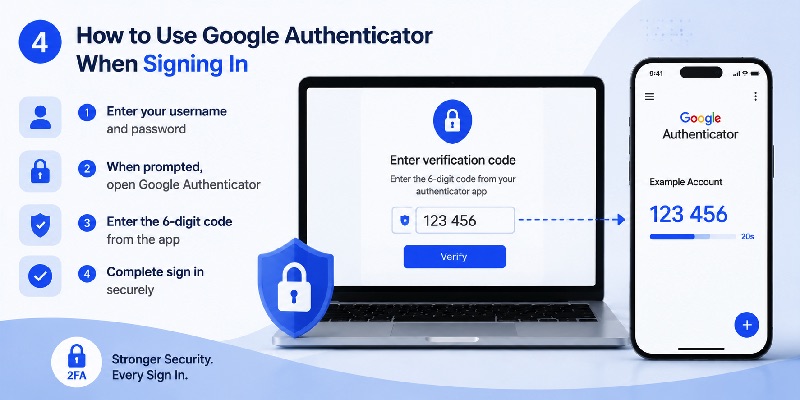
After setup, the daily google authenticator use is very simple.
Normal login process
Suppose you have already activated 2FA.
First, open the website and enter your normal login credentials.
The website may then display:
Enter the code from your authenticator app.
At this point:
- Unlock your phone.
- Open Google Authenticator.
- Locate the appropriate account.
- Read the current six-digit code.
- Return to the login screen.
- Enter the code.
- Continue signing in.
That is essentially how to use google authenticator 2fa for everyday logins.
What if the code changes while entering it?
Authenticator codes are temporary.
If the current code is about to expire, waiting for the next one can reduce failed attempts.
When a new code appears, enter that code promptly.
Why is my Google Authenticator code incorrect?
If you understand how to use google authenticator but your code keeps failing, check several basic issues.
First, make sure you selected the correct account inside Authenticator.
Second, make sure the phone’s date and time are correct.
Third, wait for a fresh verification code and try again.
Finally, check whether the website’s 2FA configuration was recently reset. If it was, an older Authenticator entry may no longer be valid.
Do not repeatedly enter random codes. If the setup has changed, reconnect the Authenticator App using the website’s security settings.
5. How to Use Google Authenticator for Gmail
A common reason people search how to use google authenticator is to protect Gmail or a Google Account.
Technically, authentication is configured for your Google Account rather than Gmail alone.
Enable 2-Step Verification first
Google’s current instructions direct users to their Google Account, then Security & sign-in, and then the 2-Step Verification settings.
Start by signing in to your Google Account.
Then:
- Open your account security settings.
- Find the sign-in or 2-Step Verification section.
- Turn on 2-Step Verification if it is not already active.
- Add an authenticator as one of your verification methods.
- Follow Google’s on-screen enrollment process.
Once the Authenticator App is connected, the code it generates can be used when Google requests that verification method.
How to use Google Authenticator for Gmail login
When signing in:
- Enter your Gmail address.
- Enter your password.
- Continue to the second verification step.
- If necessary, select another verification method and choose the authenticator option.
- Open Google Authenticator.
- Locate your Google Account.
- Enter the displayed code.
That is the practical method to use google authenticator for gmail.
Google may also offer other sign-in methods, including prompts, passkeys, security keys, or backup codes, depending on your account configuration.
Save Google backup codes
This is an important part of learning how to use google authenticator safely.
Google allows users with 2-Step Verification to create backup codes for situations where their normal second verification method is unavailable.
Store these securely.
They may be particularly useful if you:
- lose your phone;
- replace your phone;
- uninstall Authenticator accidentally;
- cannot access your normal verification method.
📖 Explore Articles: Google OTP App: Complete Guide to OTP, TOTP, and 2FA
6. How to Use Google Authenticator for Facebook
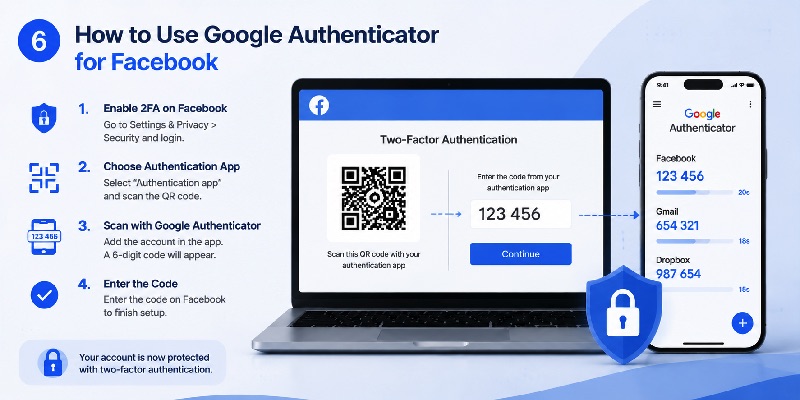
Another major search intent is how to use google authenticator for facebook.
Facebook supports third-party authentication apps for two-factor authentication, including Google Authenticator.
Can I use Google Authenticator for Facebook?
Yes.
If you’re asking can i use google authenticator for facebook, Facebook currently supports authentication applications as a two-factor authentication method.
You must already have access to your Facebook account to add a new third-party authenticator method.
How do I use Google Authenticator for Facebook?
The current Facebook settings flow uses Accounts Center.
From Facebook:
- Open your profile menu.
- Open Settings & privacy.
- Select Settings.
- Open Accounts Center.
- Select Password and security.
- Select Two-factor authentication.
- Choose the Facebook account you want to protect.
- Select the authentication-app option.
- Follow the setup instructions.
Facebook’s help documentation currently directs users through Accounts Center → Password and security → Two-factor authentication.
When Facebook displays a QR code, open Google Authenticator and scan it.
Enter the generated code back into Facebook to complete setup.
That answers both how to use google authenticator app for facebook and how to use google authenticator on facebook.
Save Facebook recovery codes
Once 2FA is active, Facebook can provide recovery login codes.
Its current help instructions allow users to generate recovery codes from the two-factor authentication settings under additional methods.
These codes should be stored somewhere secure rather than kept only on the device running Authenticator.
So, can you use google authenticator for facebook? Yes—and adding a recovery option immediately after setup is strongly recommended.
7. How to Use Google Authenticator on Multiple Devices
People who understand how to use google authenticator on one phone often want the same codes on another device.
Google currently provides two important approaches.
Option 1: Sync through your Google Account
When you sign in to your Google Account inside Google Authenticator, supported Authenticator codes can synchronize across your devices.
Google states that signing in with the same Google Account on a new device can automatically sync your codes to that device.
This makes it easier to use google authenticator on multiple devices.
For example:
Phone A → Google Account sync → Phone B
Both devices can then provide access to synchronized codes.
Option 2: Transfer accounts manually
If you prefer not to synchronize your codes through a Google Account, Google also supports manual transfers.
The general process is:
Old phone
- Open Google Authenticator.
- Open the transfer option.
- Select Export accounts.
- Choose the accounts to transfer.
- Display the transfer QR code.
New phone
- Install Google Authenticator.
- Open the transfer option.
- Select Import accounts.
- Scan the QR code from the old phone.
Google documents this manual transfer process as an option for users who use Authenticator without a Google Account.
Is having codes on several devices safe?
There is a trade-off.
A second device can improve availability if one phone is lost.
However, every device containing your authentication secrets should be protected with a strong device lock.
Learning how to use google authenticator safely means thinking about both accessibility and the number of places where your authentication data exists.
8. How to Use Google Authenticator on a New Phone
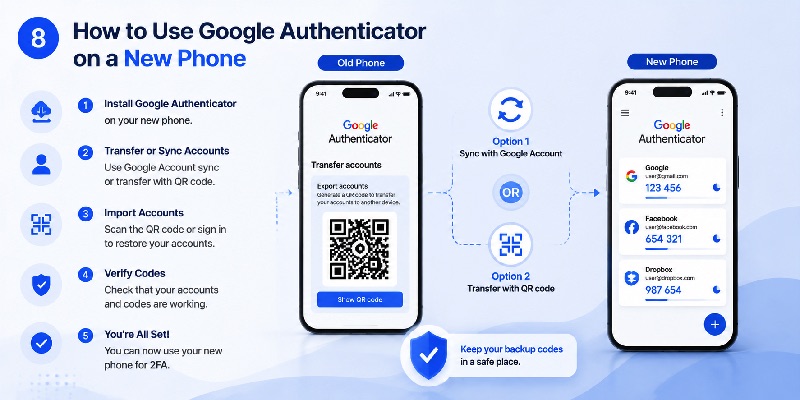
Phone replacement is one of the situations where understanding how to use google authenticator before you need it can save considerable trouble.
Do not wipe your old phone immediately.
If Google Account synchronization is enabled
Google says Authenticator codes saved to your Google Account can synchronize when you sign in to the same Google Account in Authenticator on a new device.
Therefore, how to use google authenticator on new phone may be as simple as:
- Install Google Authenticator on the new device.
- Open the application.
- Sign in with the Google Account used for Authenticator synchronization.
- Confirm that your expected accounts appear.
- Test an important login.
- Only then erase the old phone.
If you use Authenticator without an account
Use manual account transfer while you still possess both devices.
Export the accounts from the old phone and scan the resulting transfer QR code using the new phone.
Then test the codes.
Test before removing the old phone
This step is often skipped.
Pick one account and attempt to sign in using the code generated on your new phone.
Once you know the new configuration works, repeat the check for particularly important accounts.
Then store appropriate recovery methods.
A reliable how to use google authenticator workflow should always include a plan for replacing a device.
9. Can You Use Google Authenticator Without a Google Account or on PC?
Several related questions appear alongside how to use google authenticator, especially concerning Google Accounts and desktop computers.
Google Authenticator use without account
Yes, Google currently allows google authenticator use without account.
When first opening the application, Google says users can select Use without an account.
If codes are already stored through a Google Account, you can also choose to use Authenticator without an account. Google notes that doing so removes the codes from your Google Accounts and stores them on the device instead, meaning those codes will no longer be available through synchronization on your other devices.
This gives you two models:
| Setup | Storage approach | Multi-device convenience |
| Signed into Google Account | Codes can synchronize | Higher |
| Use without an account | Codes remain on device | Lower |
Neither option changes the fundamental process of how to use google authenticator when signing in.
Google Authenticator turn off cloud sync
If your goal is google authenticator turn off cloud sync, Google’s current approach is essentially to switch Authenticator to use without an account.
Before changing this setting, consider whether you will still have a recovery or transfer method if the phone is lost.
Can you use Google Authenticator on PC?
The standard Google Authenticator workflow is built around using the authenticator on a supported mobile device while signing in on your computer.
So when users ask can you use google authenticator on pc, the usual workflow is:
PC login → Authenticator on phone → enter code on PC
You do not need Authenticator itself running on the computer to authenticate a PC login.
The same explanation applies to the query use google authenticator on pc.
Open the account on your PC, reach the verification screen, then obtain the code from your authenticator device.
For most users learning how to use google authenticator, keeping the authentication code on another trusted device also preserves a clearer separation between the device where the password is entered and the second factor.
10. How to Manage, Recover, or Turn Off Google Authenticator
Knowing how to use google authenticator also means knowing what to do when something changes.
What if you lose your phone?
Your response depends on the account and your previous setup.
Possible recovery methods can include:
- Google Authenticator synchronization;
- another device containing your codes;
- backup codes;
- another 2FA method;
- a security key;
- account recovery.
For Google Accounts, Google specifically provides backup codes for situations where you cannot access your normal second verification method.
For Facebook, recovery codes can also be generated while you still have account access.
Different services have different recovery procedures.
Do not assume Google can recover an authentication credential belonging to an unrelated third-party service.
What if Google Authenticator shows the wrong code?
Try this checklist:
- Confirm the correct account is selected.
- Wait for the next code.
- Check automatic date and time on the phone.
- Verify that 2FA has not been reset on the website.
- If necessary, remove and reconnect the Authenticator method through the website’s security settings—but only while you still have another way to access the account.
These steps solve many common problems after learning how to use google authenticator.
Should I use Google Authenticator?
If you’re wondering should i use google authenticator, an authenticator-based second factor can provide more protection than using only a password.
But the Authenticator App should be part of a broader account-security plan.
Also:
- use unique passwords;
- protect your phone with a screen lock;
- keep recovery methods available;
- never share setup QR codes;
- review devices signed into important accounts;
- remove authentication methods from old devices when appropriate.
How to turn off Google Authenticator
There is an important distinction here.
You usually do not disable 2FA simply by deleting Google Authenticator from your phone.
Instead, go to the website where Authenticator was configured and change its security settings.
For a Google Account, Google’s official process allows users to turn off 2-Step Verification from the account’s security settings. Google warns that doing so removes an additional security layer.
Therefore, if you want to turn off google authenticator for a particular account:
- Sign in to that account.
- Open Security settings.
- Find Two-Factor Authentication or 2-Step Verification.
- Remove or replace the authenticator method.
- Verify another authentication method if required.
- Only then remove the old Authenticator entry if you no longer need it.
Do not uninstall the app first if it is your only working way to access important accounts.
Google Authenticator final checklist
After learning how to use google authenticator, use this checklist for every important account:
Before setup
- Confirm you can access the account.
- Install the official Authenticator App.
- Secure your phone with a passcode or biometric lock.
During setup
- Open the website’s security settings.
- Choose Authenticator App or 2FA.
- Scan the displayed QR code.
- Confirm the temporary verification code.
After setup
- Save recovery codes.
- Test one login.
- Decide whether you want Authenticator synchronization.
- Keep account recovery information current.
- Never publish or share the setup QR code.
The complete how to use google authenticator process can therefore be summarized in one simple workflow:
Enable 2FA → scan the QR code → verify the generated code → save recovery methods → use the code whenever the service requests it.
Once the first account is configured, adding additional services becomes routine. When a website supports an Authenticator App, open its security settings, generate the setup QR code, scan it with Google Authenticator, and verify the first code.
For Gmail and Google Accounts, configure the authenticator through Google’s 2-Step Verification system. For Facebook, use Accounts Center and select an authentication app as your two-factor method. Both platforms also provide recovery options that should be configured while you still have normal account access.
The biggest mistake when learning how to use google authenticator is focusing only on setup and ignoring recovery. Phones are replaced, devices are lost, and security settings change. Syncing your codes where appropriate, keeping backup codes, or maintaining another secure verification method can prevent a lost device from turning into a locked account.
For most users, the best routine is straightforward: keep Google Authenticator on a secured phone, activate two-factor authentication on important accounts, verify every setup before leaving the security page, and maintain a safe recovery method.
With those habits in place, how to use google authenticator becomes less about repeatedly configuring security and more about a simple everyday action: when a supported account requests a second factor, open Google Authenticator, find the correct account, enter the current code, and continue securely.
Download Authenticator App
Secure your accounts with fast, reliable two-factor authentication. Download now and protect your login in seconds.